When your chain is working correctly, you might not even notice it’s there -but if it is dirty or worn, you might end up with poor shifting, too much squeaking, a broken chain, or even a damaged drive train. But with a few essential tools and a little elbow grease, you can take good care of your chain to keep your rides – and your chain – running smoothly.
There are five essential tools to properly maintain your chain and prevent drivetrain damage:
- Chain wear indicator
- Chain breaker
- Chain cleaner
- Chain cleaning tool
- Chain lubricant
In this article, we will talk about them and how to use them. Let’s get started!
Why You Need Chain Tools
If you take good care of your chain, you can extend the life of your cassette and cogs, and it’ll also save you money over time. In addition, the shifting will be much smoother, and thus you’ll have a much more enjoyable ride too.
Electric bikes built for everything and priced for everyone. Shop Rad Power Bikes, America's #1 electric bike brand. Get out. Go further. Ride Rad.
A well-maintained chain will use your power better, with less energy loss from dirt and grime.
A few essential tools will go a long way toward a great chain.
Chain Wear Indicator Tool
Because your chain is always working, it will get a lot of wear and tear. Over time, the chain will ‘stretch’ and actually get longer. When this happens, the links can’t sit into the teeth of the cogs and cassettes as well, which makes your shifting feel clunky, and you might even drop your chain.
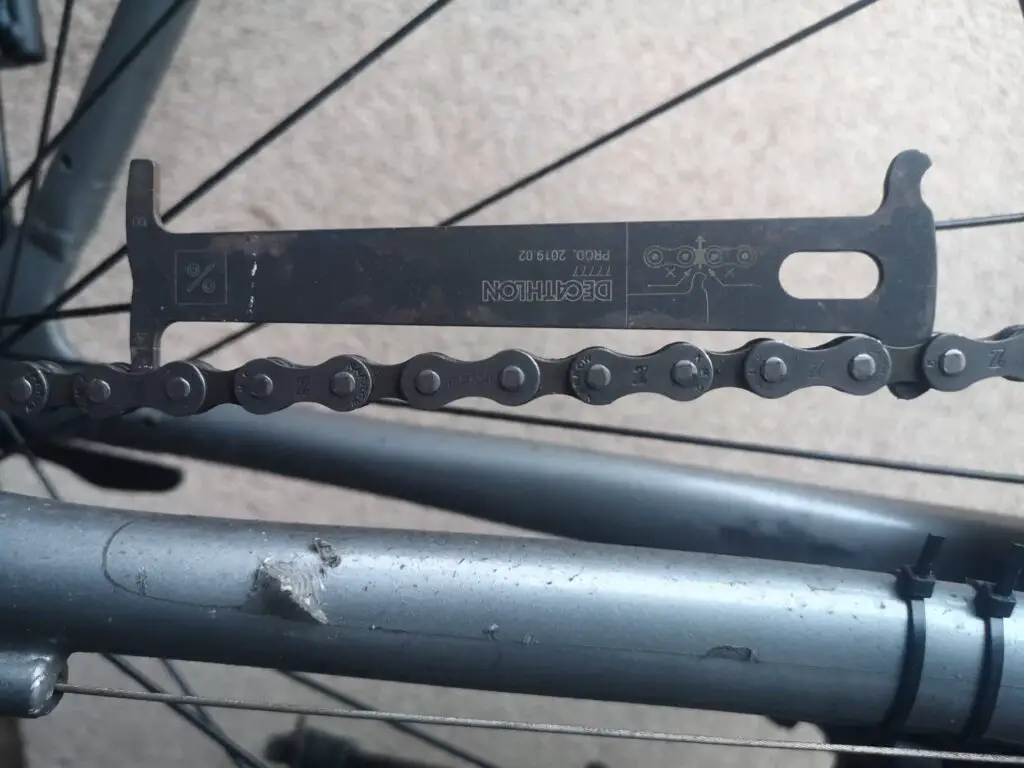
You probably need to change your chain every 2000 to 3000 miles, depending on how often you ride, how well you maintain your chain, and your riding conditions. A better way to know if you need to get a new chain is to use a chain wear indicator tool.
How to Use a Chain Wear Indicator Tool
With modern bikes, it is recommended to replace your 11 or 12-speed chain when it has stretched .5%. Likewise, you’ll need to replace your 8, 9, or 10-speed chain when it has stretched .75%.

That might not seem like much, but it is a measurable amount when you use a chain-wear tool.
The chain wear tool is a small, simple tool. Insert the back end of the chain wear tool into the space between links. If the front of the tool drops all the way into the chain, your chain is worn and needs to be replaced. On the other hand, if the tool sits above the chain, it’s still good.
Caveats
A very dirty chain won’t look as worn as it actually is because the grit and grime may keep the chain tool from settling all the way into the chain.
Also, too much tension on the chain may make it look more worn than it actually is. So measure your chain when it is clean, and measure it in 3 to 5 places around the chain, so you get a better idea of how worn it actually is.

Chain Breaker
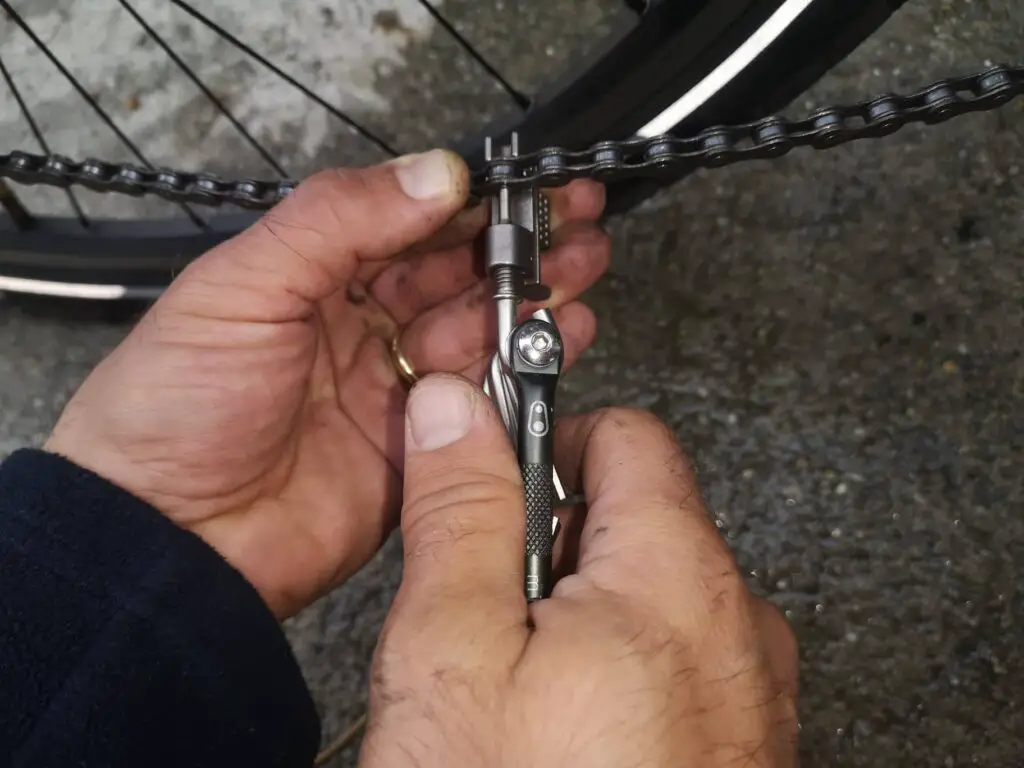
A chain breaker is sometimes called a chain splitter or even just a chain tool.
You can use the tool to remove old chains and shorten and install new ones. To break your chain, install the chain into the chain tool so that the driving pin is in line with the chain rivet. Then, turn the handle to push out the rivet, and the chain will come apart.
You can see Calvin from Park Tool demonstrate how to use a chain breaker in this video.
Chain Cleaner
A dirty chain will slow you down and wear out your drive train faster. So a clean chain is essential to a smooth ride, smooth shifting, and a well-maintained bike.
There are plenty of commercial chain cleaners and degreasers to choose from, such as Muc-Off Drivetrain cleaner or WD-40 Specialist Bike Chain Degreaser.
Before using the chain cleaner, use a brush or rag to wipe off any large bits of debris or dirt. This could be messy, so you might want to do it outside! If you have disc brakes, you may want to cover your rotors before you clean the chain. Then spray the chain cleaner on the chain and the cassette, if desired, and allow it to penetrate.
Next, gently scrub the chain with a brush, rag, or chain-cleaning tool. Then rinse the chain thoroughly with water. Once the chain is dry, you can apply your choice of chain lubricant.
Chain Cleaning Tool
A chain cleaning tool is a device that makes it easier to clean your chain without having to remove it from the bike.
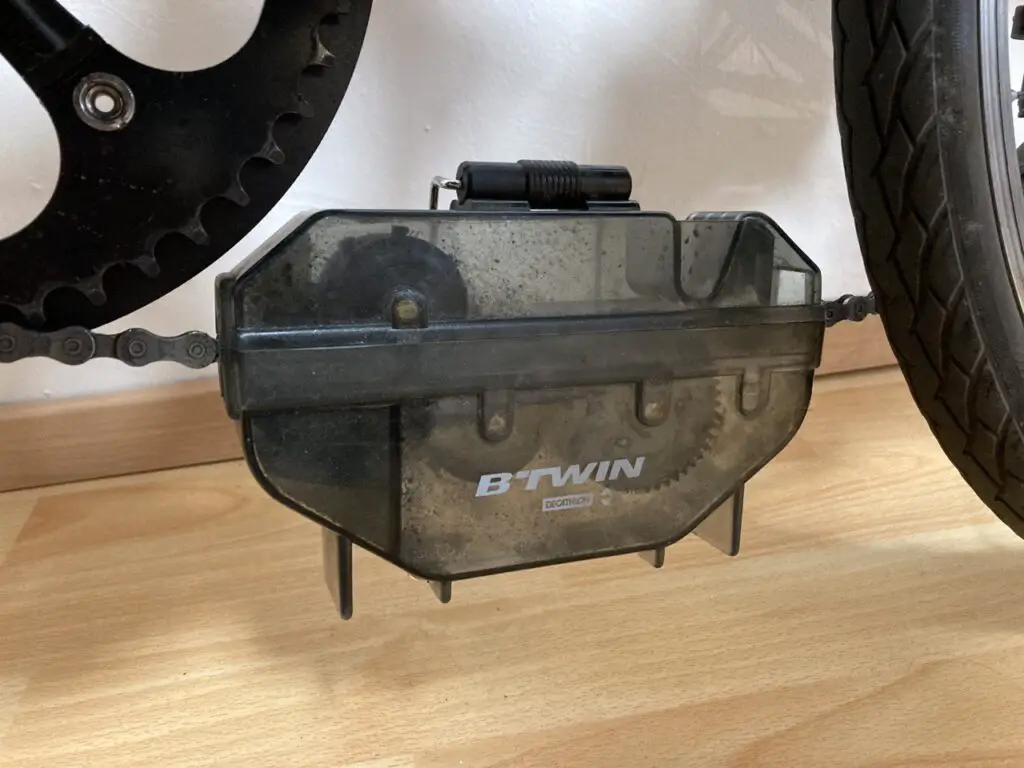
A chain cleaning tool has a small compartment that you fill with water and your favorite chain cleaner. Inside the compartment are small brushes that will clean your chain as you turn the pedals. Here’s how to use it:
1. Shift your bike so that you are in the small chain ring in the front and a smaller chainring in the back so that the chain has the most ‘give’ to it.
2. Use a rag or brush to remove any large clumps of dirt and debris. This could get messy!
3. Remove the lid and put some water and chain cleaner in the well of the chain cleaning tool.
4. Lift the chain cleaning tool up to the bottom of the lower part of the chain, fitting the chain inside. Carefully put the lid on top so the brushes are against the chain.
5. Hook the handle over the rear derailleur, if it has one. This will keep the chain cleaning tool in place.
6. Gently turn the pedals so that the chain moves through the cleaning tool. Be slow and deliberate so you don’t drop the chain.
7. Once the solution looks dirty, you can empty it and repeat the steps until there is no more dirt and grease to be removed.
8. Empty the chain cleaning tool and fill it with just water and repeat one more time to rinse away any remaining degreaser.
9. Make sure the chain is dry before adding lubricant.
Chain Lubricant
There are many different types of lubricants, but the most common are wet lubricants that come in a small bottle. These are easy to use!
Chain lube is essential because it keeps your chain running smoothly. If you don’t use lube, your chain will squeak, shift poorly, and cause extra wear on the drivetrain. Here’s how to use it:
1. Start with a clean chain.
2. Shift into your small chain ring in the front and a smaller cog in the back to give your chain some extra play.
3. If you have a master link or joining pin, find it – this is a great way to check your progress to know if you put chain lubricant on the entire chain. Turn the pedals until the master link is in a visible position on the lower portion of the chain.
4. Hold a rag under the chain to catch any drips, and gently drip the lubricant into the rollers of the chain. After you complete a section, turn the pedal to a new section. Keep going until you have put lubricant on every link.
5. Allow the lubricant to penetrate each link well.
6. Use the rag to wipe off the extra lubricant while gently and slowly pedaling backward. Excess lubricant will attract dirt and grime that can wear out your drivetrain. Also, if the rag becomes greasy and black as you are wiping off the extra lube, it means your chain wasn’t thoroughly cleaned.
With a little bit of maintenance and a few essential tools, you’ll have a clean, smoothly running chain that lasts for miles and miles!